Bird nesting on a sewing machine is fixable in most cases within 10 to 15 minutes, and it almost always comes down to one of three things: the top thread was loaded with the presser foot down, the bobbin isn't seated correctly, or there's lint buildup jamming the tension system. Here's how to diagnose exactly where your problem is and get clean stitches again.
How to Fix Bird Nesting on a Sewing Machine: Step-by-Step

Maya Bennett
16 Apr 2026
What 'bird nesting' actually means (thread tangle, not an actual nest)
The term refers to a dense, looping knot of thread that forms on the underside of your fabric, near the bobbin area, or around the needle plate. It looks remarkably like a small bird's nest made of fiber, which is where the name comes from. Technically, it happens when there's not enough needle thread tension to pull the bobbin thread up correctly into the seam, so the top thread loops wildly underneath instead of locking into a balanced stitch.
It is not a sign your machine is broken. It's almost always a setup or threading error, and it can happen to experienced sewists too, especially when switching thread types, fabrics, or bobbins mid-project. If you've been wondering why your sewing machine keeps bird nesting across multiple projects, there's usually a repeating habit or mechanical condition causing it, and this guide will help you track it down.
Stop here first: quick safety checks before you touch anything

Before you start pulling thread or removing the needle plate, do these three things. First, turn off and unplug the machine. Thread jams can cause the needle to fire unexpectedly when the motor is energized, and fingers near the needle area on a live machine is a genuine injury risk. Second, don't yank the fabric out. Pulling tangled fabric hard can bend the needle, score the needle plate, or damage the hook assembly. Cut the threads close to the fabric with small scissors and gently ease the fabric free. Third, take a photo of the tangled area before you clear it, especially if this is a recurring problem. A photo helps you and any repair technician understand what happened.
Stop using the machine entirely and take it in for service if you notice any of these warning signs after clearing the jam: the needle hits the presser foot or plate on the way down, the handwheel turns with unusual resistance, you hear a grinding or clicking noise during stitching, or the hook assembly looks bent or scratched. A timing issue or a damaged hook cannot be fixed by rethreading, and continuing to sew with mechanical damage makes repairs more expensive.
Diagnosing the cause before you fix anything
Bird nesting has a handful of common causes, and knowing which one you're dealing with saves you from fixing the wrong thing. The most frequent culprit by far is threading with the presser foot down. When the presser foot is lowered, the tension discs are closed, so the thread slides between them without actually being gripped. You get zero top tension, and the top thread dumps freely underneath the fabric as soon as you start sewing. The fix is simple but the habit is easy to skip.
The second most common cause is a bobbin that's inserted incorrectly, wound unevenly, or the wrong type for your machine. If the bobbin thread isn't sitting in the bobbin case tension spring, it feeds without any resistance and the stitch can't lock. Mixing up bobbin types (for example, using a Class 15 bobbin in a machine that takes a Class 66) causes subtle fit problems that show up as thread bunching or tension inconsistencies.
Lint buildup is the third big one. Lint accumulates fast around the bobbin case and under the needle plate, and a packed bobbin area interferes with thread path and tension even when everything else is set up correctly. Beyond those three, what causes bird nesting in embroidery specifically often includes thread weight mismatches and stabilizer issues that compound tension problems, especially at higher stitch speeds.
Less common but worth knowing: a bent or dull needle, an incorrect needle-to-thread pairing, a top tension setting that's too low, or a mechanical timing issue where the hook doesn't pick up the needle loop at exactly the right moment. The first four causes account for the vast majority of bird nesting problems. Timing issues are rare and usually only appear after a needle strike or a major jam.
Step-by-step fixes by location
Top thread path and take-up lever
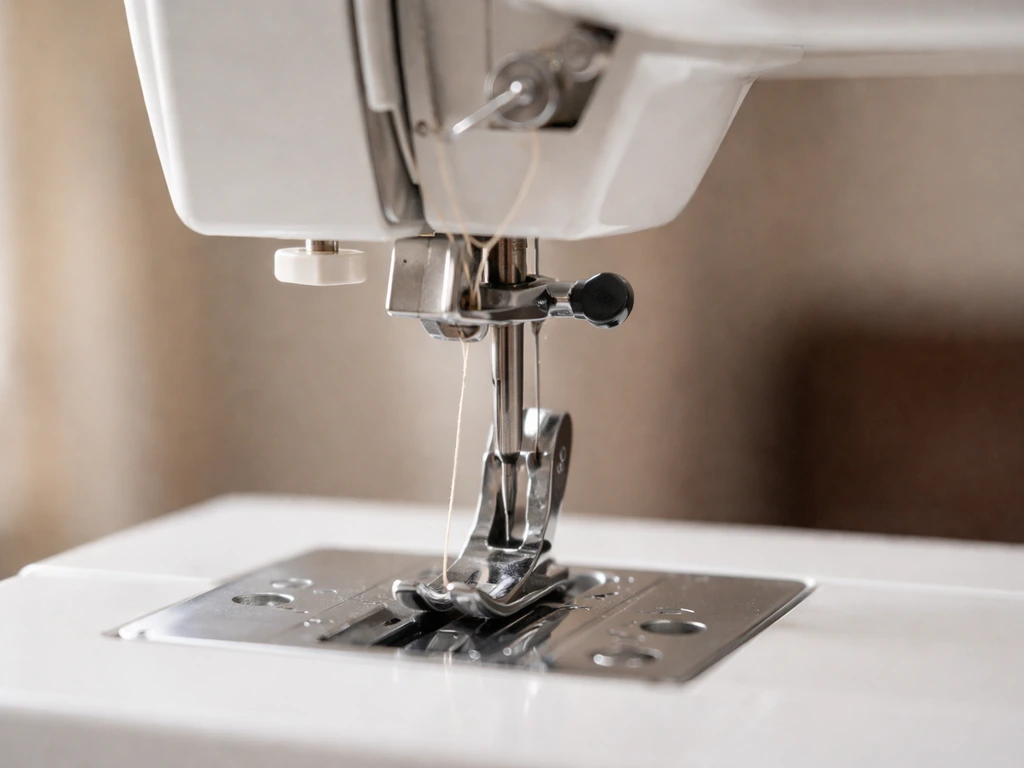
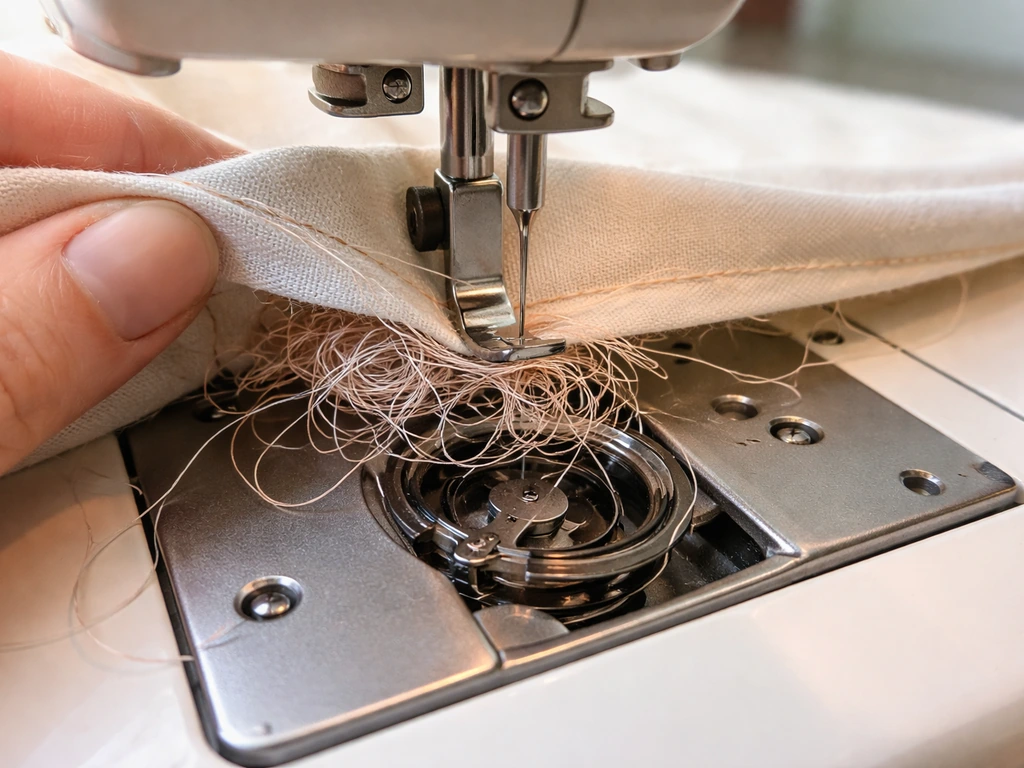
Raise the presser foot and raise the needle to its highest position using the handwheel. Remove all the top thread completely, back through every guide. Now rethread from scratch with the presser foot fully raised the entire time. This is the most important step. With the foot up, the tension discs open and the thread seats properly between them. Follow your machine's threading diagram exactly, making sure the thread passes through the take-up lever (the moving hook near the top of the machine). Missing the take-up lever is a common mistake that almost always causes bird nesting because the thread can't be pulled back up on each stitch cycle.
If your machine has multiple thread guides along the front or side of the needle bar, use all of them in sequence. After rethreading, hold both thread tails (top and bobbin) toward the back of the machine and take a few slow test stitches by hand with the handwheel before running the motor. Top thread <a data-article-id="2D17E30D-6141-4CB9-A6BC-94B519E5C7C1">bird nesting under fabric</a> is almost always caused at this stage, so if you still get bunching after a clean rethread with the foot raised, move on to checking the bobbin.
Bobbin case and bobbin area
Remove the bobbin and bobbin case completely. Look at the bobbin itself: the thread should be wound evenly and smoothly, not layered unevenly, loose, or crossed. An unevenly wound bobbin feeds inconsistently and causes tension variation stitch by stitch. If the winding looks off, rewind it. When you reinsert the bobbin, check that the thread feeds in the correct direction (clockwise or counterclockwise as specified in your manual) and that it clicks or seats under the tension spring in the bobbin case. You should feel a light, consistent resistance when you pull the bobbin thread out by hand. If it pulls out with zero resistance, the thread isn't in the tension spring.
For drop-in (top-loading) bobbins, make sure the bobbin sits flat in the compartment with no wobble, and that the thread routes through the guide channel before you close the cover. Brother's troubleshooting specifically calls out checking bobbin case position and resetting it per the instruction manual when thread bunching occurs, and Singer notes that if the bobbin thread isn't in the bobbin case tension, bunching is almost guaranteed. Brother's industrial sewing-machine FAQ also emphasizes checking the bobbin case position and related bobbin parts, since bobbin tension and bobbin-case components can affect stitch behavior and cause thread bunching.
Under the needle plate and feed dog area
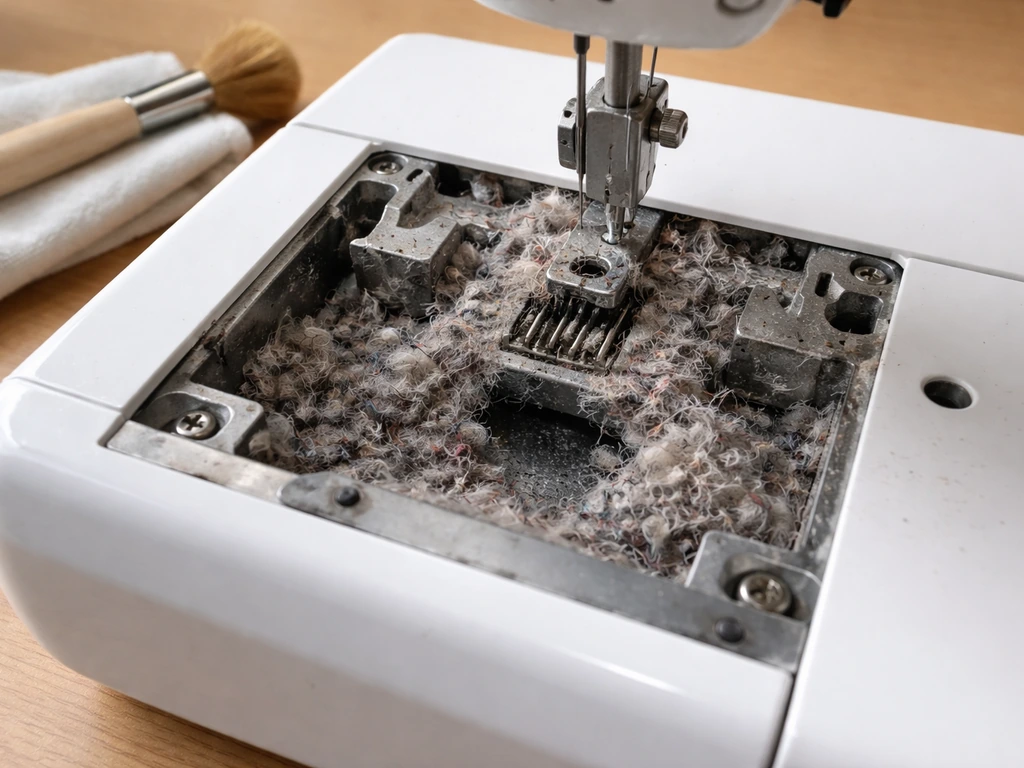
This area collects lint faster than anywhere else on the machine. With the machine unplugged, remove the bobbin cover and the needle plate (usually held by one or two screws). Use a small brush, not compressed air if you can help it, to sweep lint out rather than blowing it deeper into the mechanism. Clear lint from around the feed dogs, the rotary hook guard, and the bobbin case housing.
The goal is a lint-free, clean bobbin case area before you reassemble. If you keep seeing top thread bird nesting under fabric, revisit the top tension and rethreading steps after you clear this lint buildup. Compressed air is convenient but can push lint into the motor or timing area, so a brush or small vacuum attachment is safer for regular cleaning.
Reassemble in reverse order, making sure the needle plate sits flush and the screws are snug. A needle plate that's slightly misaligned can catch thread on every stitch.
Adjustments and tuning after you've cleared the tangle
Once you've rethreaded top and bottom and cleaned the bobbin area, check your tension setting. Most general sewing on medium-weight fabric works well at a top tension of 4 to 5 on a standard numbered dial. If you had bird nesting, your top tension was effectively zero (threading error) or genuinely too low. Brother's guidance recommends resetting to a tension of 4 if it was set too low after correcting a threading problem. Try a test swatch on the same fabric you were using and look at the underside: if you still see looping top thread, increase tension in small increments (half a number at a time).
Check your needle. A bent needle, a dull needle, or the wrong type for your fabric is an underappreciated cause of tension problems. The needle should be fully inserted with the flat side facing back, and the clamp screw should be tight. If you had a hard jam, replace the needle automatically since needles can micro-bend during a jam without looking visibly damaged. Match needle size to thread weight: a size 80/12 universal needle works for most medium-weight fabrics with standard 40-weight thread, while heavier denim or canvas needs a 90/14 or 100/16 with correspondingly heavier thread.
Presser foot pressure is worth a look too, especially if you're sewing very light or very stretchy fabric. Too little presser foot pressure means the fabric isn't being held down firmly enough as the needle rises, which lets the fabric lift with the needle and disrupts the loop formation the hook needs to catch. Most machines have a presser foot pressure dial or screw; consult your manual for the correct starting point for your fabric type.
| Problem Symptom | Most Likely Cause | Fix |
|---|---|---|
| Tangled loop on underside, first stitch only | Threads not held behind presser foot at start | Hold both thread tails toward back when beginning to sew |
| Consistent looping under fabric throughout seam | Top thread threaded with presser foot down | Rethread completely with presser foot raised |
| Bunching on underside with thread break | Bobbin not seated in tension spring | Remove and re-insert bobbin, confirm it clicks under spring |
| Irregular bunching, not every stitch | Unevenly wound bobbin or lint in bobbin area | Rewind bobbin, clean bobbin case and under needle plate |
| Looping on top of fabric instead | Bobbin tension too loose or bobbin inserted backward | Check bobbin direction and tension spring resistance |
| Bird nesting recurs after correct threading | Bent needle or timing issue | Replace needle; if persists, take to a technician |
Preventive habits that stop this from happening again
The single best habit you can build is always raising the presser foot before threading. It takes one second and eliminates the most common cause of bird nesting entirely. Make it automatic by never touching the thread spool until the foot is up. Similarly, always hold both thread tails (top and bobbin) toward the back of the machine and off to one side for the first two or three stitches. This keeps the thread from getting pulled down under the plate at the start of a seam, which is when jams are most likely to happen.
Clean the bobbin area every three to four bobbins, or any time you notice the machine sounding slightly different (a light clicking or scraping often means lint accumulation). Singer’s instruction manual also recommends [cleaning the area under the bobbin case after sewing several times](https://www. manualslib. com/manual/3924011/Singer-Patchwork-Plus-C5980q.
html? page=35) to remove dust and lint buildup. For regular maintenance, remove the needle plate and brush out the feed dog channels and bobbin housing. Add a drop of sewing machine oil to the hook race (the circular track the bobbin case rotates in) every eight to ten hours of sewing time, or as directed in your manual.
Lint and dry metal surfaces are the two things that shorten the life of a sewing machine faster than anything else.
Run a test swatch every time you change thread type, fabric weight, or needle. A 10-centimeter seam on a scrap of your actual project fabric tells you immediately whether your tension and needle settings are right before you commit to the real piece. This is especially important with embroidery threads, specialty fibers like metallics, or very lightweight fabrics like chiffon. For a broader breakdown of staying ahead of the problem, how to prevent bird nesting when sewing covers additional proactive steps including stabilizer use, stitch speed, and bobbin winding best practices.
- Always raise the presser foot before threading the top thread
- Hold thread tails toward the back for the first few stitches on every new seam
- Wind bobbins at consistent, moderate speed for even layering
- Use only the correct bobbin type specified for your machine model
- Replace needles every 8 to 10 hours of sewing or after any hard jam
- Clean the bobbin area every 3 to 4 bobbins
- Oil the hook race per your manual's schedule
- Run a test swatch each time you change fabric, thread type, or needle size
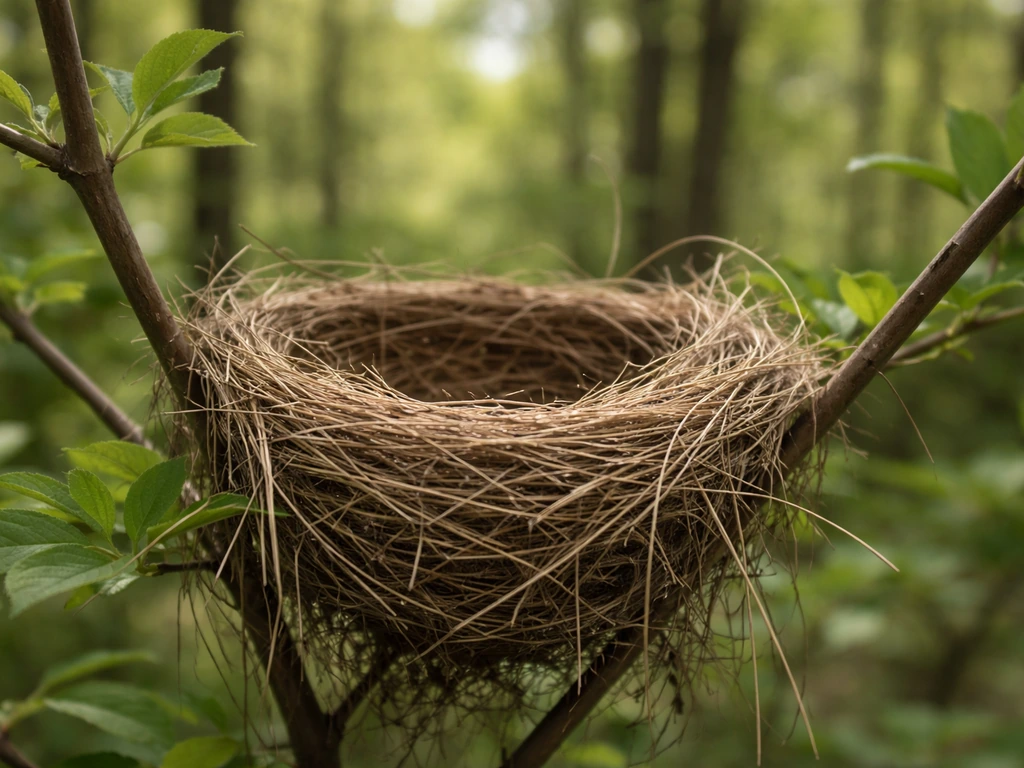
If you actually found a real bird nest near your machine
This is less common than the sewing problem, but it does happen, especially if your sewing space is in a garage, shed, barn, or near an open window. Birds occasionally build nests in storage areas, in fabric bins, or on equipment that sits unused for a few weeks in spring. If you've opened your sewing cabinet or reached into a storage area and found an actual nest with eggs or nestlings, stop immediately and don't handle it further.
Most wild bird nests in the United States are protected under the Migratory Bird Treaty Act, which means disturbing or removing an active nest (one with eggs or live young) without a permit is illegal. The right move is to back away, avoid disturbing the area, and contact a licensed wildlife rehabilitator if the nest has been damaged or a bird appears injured. Many nestling birds that people find on the ground or in unusual locations are not orphaned. The parent bird is often nearby but staying away because of human presence, so watching from a distance for an hour or two before assuming the bird needs help is always the right first step.
If a bird has been caught or injured by a pet, or if you can see that a nest has been physically damaged, place any displaced nestling somewhere quiet, warm, and dark, and call a local wildlife rehabilitator or your state wildlife agency immediately. Don't try to feed the bird or keep it as a temporary pet. Wildlife rehabilitators have the training, permits, and equipment to give the bird the best chance of survival, and most can advise you over the phone within minutes on what to do while you wait for help.
FAQ
How can I tell if the bird nesting is coming from the top thread setup or the bobbin tension?
Do a slow test with the presser foot up thread-up rethreaded, then sew 3 to 5 stitches while holding the top and bobbin threads to the back. If the underside loops immediately even on slow hand-guided stitches, it points to top-thread path (missed take-up lever or tension discs). If it starts fine and worsens as stitches continue, recheck bobbin case seating and whether the bobbin thread is actually caught in the tension spring, since zero-resistance feeding often shows up after a few stitch cycles.
What should I do if I rethreaded correctly with the presser foot up but bird nesting still happens only with certain fabrics?
That pattern often means the needle and thread are mismatched for that fabric weight or that presser foot pressure is too low. Try a fresh needle of the correct type (universal vs. denim/ballpoint) and reset presser foot pressure to the manual’s starting point for the fabric. Also reduce stitch length slightly on slippery fabrics, because extremely short stitches can trap loops before the hook can pull them through cleanly.
Can using the wrong bobbin thread or bobbin brand cause bird nesting even if I’m using the correct bobbin model?
Yes. Even when the bobbin type matches (Class/shape), bobbin thread can differ in diameter, twist, and finish, which changes how the thread behaves in the bobbin case tension spring. If you switched to a different bobbin thread brand or weight, rewind a few bobbins with the new thread and test on a scrap, since some combinations feed too easily or too tightly and will create looping despite correct placement.
Why do I still get bird nesting when I sew slowly by hand but not when I run the machine fast?
It can be a sign of thread path issues around the take-up lever or an inconsistent hook pickup timing relative to the needle’s motion. Fast motion can sometimes mask a borderline setup because the take-up lever completes more consistently. Still, if hand-stitching produces nesting, double-check that the thread passes through every guide and that the take-up lever is moving through the correct cycle, then retest with fresh bobbin thread.
Is it safe to use compressed air to clear lint from the bobbin area?
It’s safer to avoid blasting lint deep into the machine, because compressed air can force debris into the motor, sensors, or timing area. If you do use it, use very short bursts at a distance and follow immediately with a brush or vacuum attachment at the bobbin case and under the needle plate. For routine cleaning, a small brush or vacuum attachment is the better default.
What happens if the needle plate screws are a little loose or the plate is not seated flush after cleaning?
Even a slight misalignment can cause the needle plate to catch or drag thread on every stitch, which looks similar to bird nesting but actually creates repeat loops and snagging at the same stitch point. After reassembly, confirm the plate sits flat all the way around, tighten screws snugly (not stripped), and re-run a test stitch line while watching whether the thread looks disturbed right as it enters the plate area.
How often should I replace the needle if bird nesting happens after a jam?
If there was any needle strike, replace the needle immediately, even if it looks straight. Jamting can create micro-bends that subtly change the needle’s ability to form a clean loop, especially with finer threads, causing nesting that seems like a threading issue but will not fully resolve until the needle is new.
My machine nests only at the start of seams, how do I prevent that?
The simplest fix is to keep both thread tails pulled gently toward the back while making the first two to three stitches, then trim and continue. Also ensure you start with the needle and thread properly positioned before lowering the presser foot. If you release the threads early, the top thread can get pulled down under the plate before stable tension is achieved, leading to early looping.
What should I check if the bobbin thread pulls out with too little or too much resistance when I pull it by hand?
If it pulls out with zero resistance, it is usually not sitting in the bobbin case tension spring, or it is routed incorrectly in the bobbin case. If it pulls out with excessive resistance, check for incorrect bobbin insertion, incorrect direction of winding feed, or lint packed around the case that creates drag. Either case can cause the top thread to loop because the stitch cannot balance properly.
Is bird nesting ever related to embroidery specifically?
Yes, embroidery can amplify tension problems because of higher stitch density, specialty threads (like metallics), and stabilizer choices. If nesting appears during embroidery but not in straight sewing, try a smaller needle size matched to the thread, slow the stitch speed, and confirm you’re using the correct stabilizer thickness for the fabric, since insufficient stabilization can let the fabric lift and disrupt hook loop formation.
What should I do if I suspect the problem is a timing issue?
Stop rethreading and take it for service if the needle hits the presser foot or plate, you feel unusual handwheel resistance, you hear grinding or clicking during sewing, or you see bent or scratched hook assembly parts. Timing problems often show up after a severe jam or impact, and continuing to sew can worsen damage and increase repair cost.
If I find an actual bird nest near my sewing area, what’s the safest next step?
Don’t handle eggs or nestlings, and back away to avoid repeated disturbance. If you see injured birds or a damaged nest, contact a licensed wildlife rehabilitator or your state wildlife agency. Many “found” nestlings are not orphaned, parents often return once the area is quiet, so waiting at a distance first is usually the correct approach.
Next Articles

Should I Let a Bird Build a Nest? What to Do Today
Decide if to let a bird nest, how to check activity, avoid disturbance, and handle conflicts safely and legally.
Can You Make a Nest for a Bird? Safe, Legal Steps
Learn safe, legal ways to help birds nest with proper materials and nest boxes, avoid active nests, and prevent harm.
Who Teaches a Bird to Make a Nest, and What You Can Do
Birds nest by instinct, not human training. Find who to contact and how to help nests safely and ethically.