If you have a bird nest in your chimney, the most important thing to know before doing anything is this: you may not legally be allowed to touch it yet. Under the Migratory Bird Treaty Act, almost every native bird species in the U.S. is protected, and so are their nests, eggs, and chicks. Removing or destroying an active nest (one with eggs or live young inside) without a federal permit is a violation of federal law, full stop. Once the nest is genuinely abandoned and all birds have left on their own, you are generally free to remove it. That timing distinction drives everything else in this guide.
How to Get Bird Nest Out of Chimney Safely and Cleanly
Maya Bennett
22 Apr 2026
Safety and legal check: do this before you touch anything
Two things need to happen before you even lean over that chimney: a legal check and a safety check. On the legal side, the U.S. Fish and Wildlife Service is explicit that a permit is required to destroy or remove an active nest containing eggs or chicks. The MBTA covers nearly all native migratory bird species, so unless you are certain the nest is empty and abandoned, you are in a wait-and-see situation. Federal consequences (fines, citation) apply for violations, so this is not a rule worth bending.
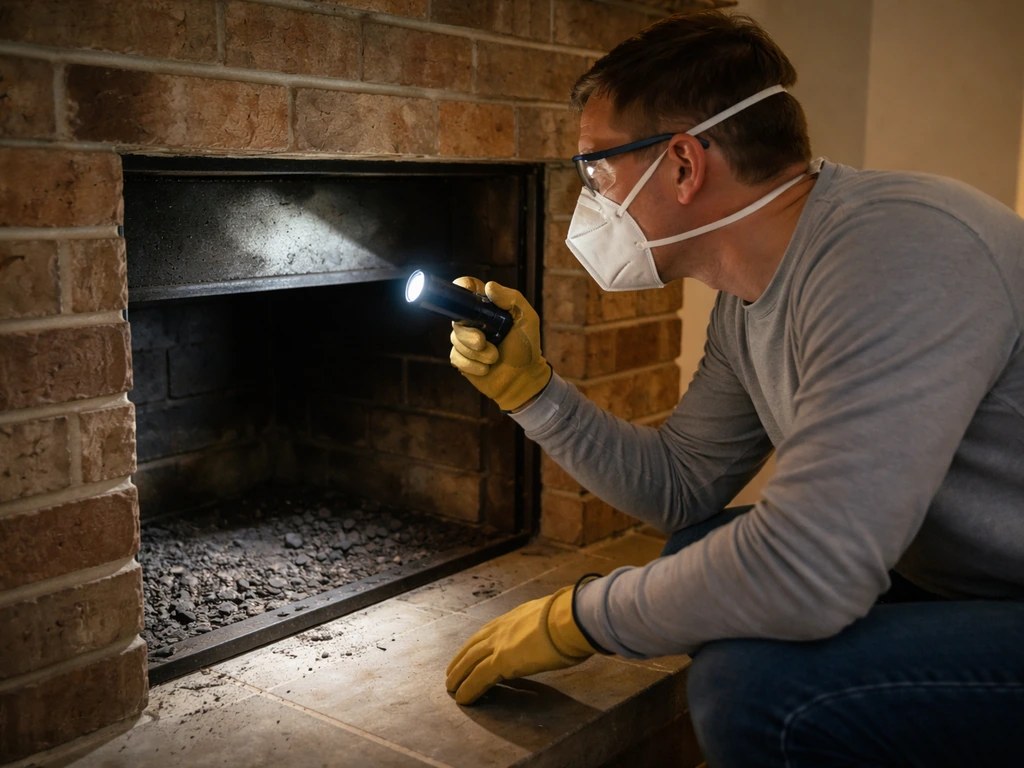
On the safety side, chimney work involves confined-space hazards, possible structural debris, and a serious health risk from accumulated bird droppings. Droppings can harbor Histoplasma capsulatum (the fungus behind histoplasmosis) as well as Chlamydia psittaci (the bacterium causing psittacosis). Both can cause respiratory illness if droppings are disturbed and particles become airborne. The rule here is simple: contain the dust, do not create aerosols, and protect your airways and skin. More on gear in a moment.
One more practical safety note: do not use the fireplace or light a fire while any nest or bird is present in the chimney. Beyond the obvious fire risk, smoke can kill adult birds or chicks outright, and it turns a manageable situation into an emergency.
Is the nest active or abandoned? How to tell
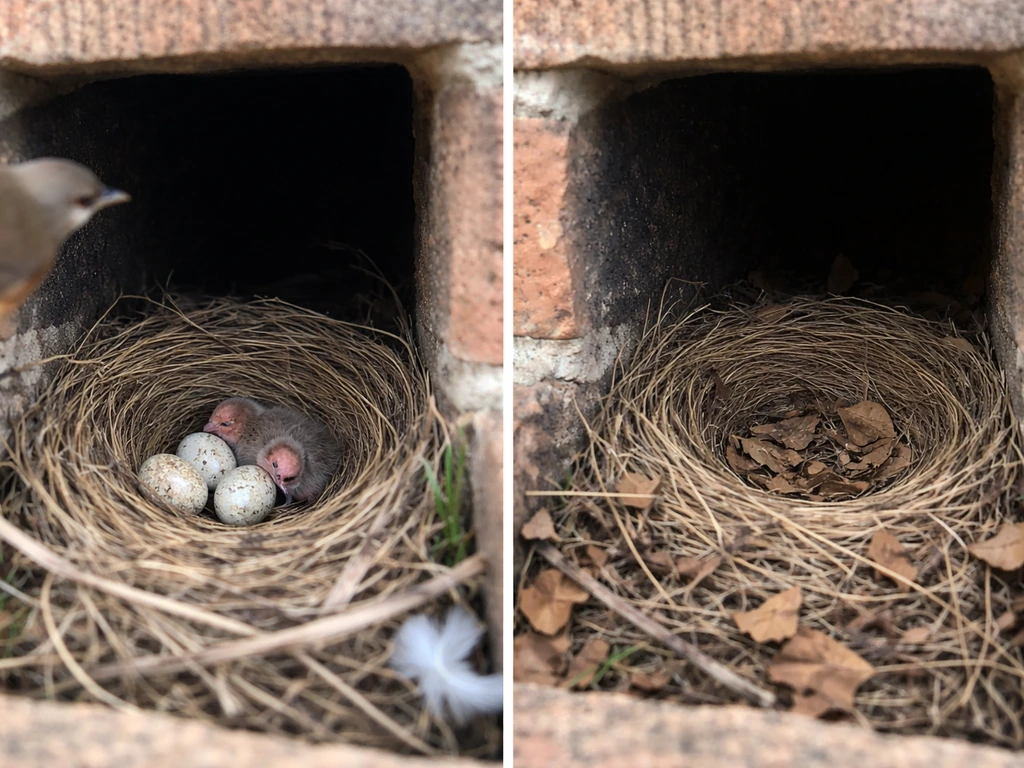
An "active" nest means one that currently contains eggs, live chicks, or a brooding adult. An "abandoned" nest is one that has been fully vacated after young have fledged (left on their own) and no bird is returning to it. These are very different situations, and your next steps depend entirely on which one you have.
Signs the nest is active
- Audible chattering, chirping, or food-begging calls coming from inside the flue, especially when adult birds fly near the chimney opening
- You can see or hear adult birds regularly entering and exiting the chimney top
- A flashlight inspection from below (at the damper level) reveals movement, visible nesting material, or droppings freshly deposited on the damper or smoke shelf
- Chimney swifts specifically make loud, high-pitched twittering calls; young swifts produce distinctive food-begging calls in the roughly three weeks before they fledge
- Noise that sounds like scratching or shuffling when you knock on the chimney surround
Signs the nest is abandoned
- No audible calls or bird activity for at least one to two weeks
- No adult birds seen entering or leaving the chimney opening
- Season: late summer or fall (after typical fledging periods) is more likely to mean the nest is vacated
- Flashlight inspection shows a dry, flat, dusty nest with no movement, no visible eggs, and no droppings that look fresh
If you are uncertain, the conservative and legally safest choice is to wait. Chimney swift young, for example, fledge and leave entirely by late summer, so a swift nest found in June almost certainly still has active occupants. If you hear ongoing noise and cannot confirm the nest is empty, contact a local wildlife rehabilitator or your state wildlife agency for guidance before proceeding.
One specific note on chimney swifts: they are the species most commonly associated with chimney nesting in the U.S. Their nests are small, shallow cups made from small twigs glued directly to the chimney wall with saliva. If you identify a swift nest, know that the species is federally protected under the MBTA, and the nest cannot legally be removed while birds are present. The practical guidance from both USFWS and Audubon is to simply wait until swifts depart in late summer or early fall before scheduling any chimney work.
What you need: tools, protective gear, and workspace setup
Chimney nest removal is not a bare-hands job. The materials involved (feathers, droppings, decomposed organic matter) carry genuine pathogen risk, and the confined flue means any disturbance sends particles straight toward your face. Here is what you need assembled before you begin.
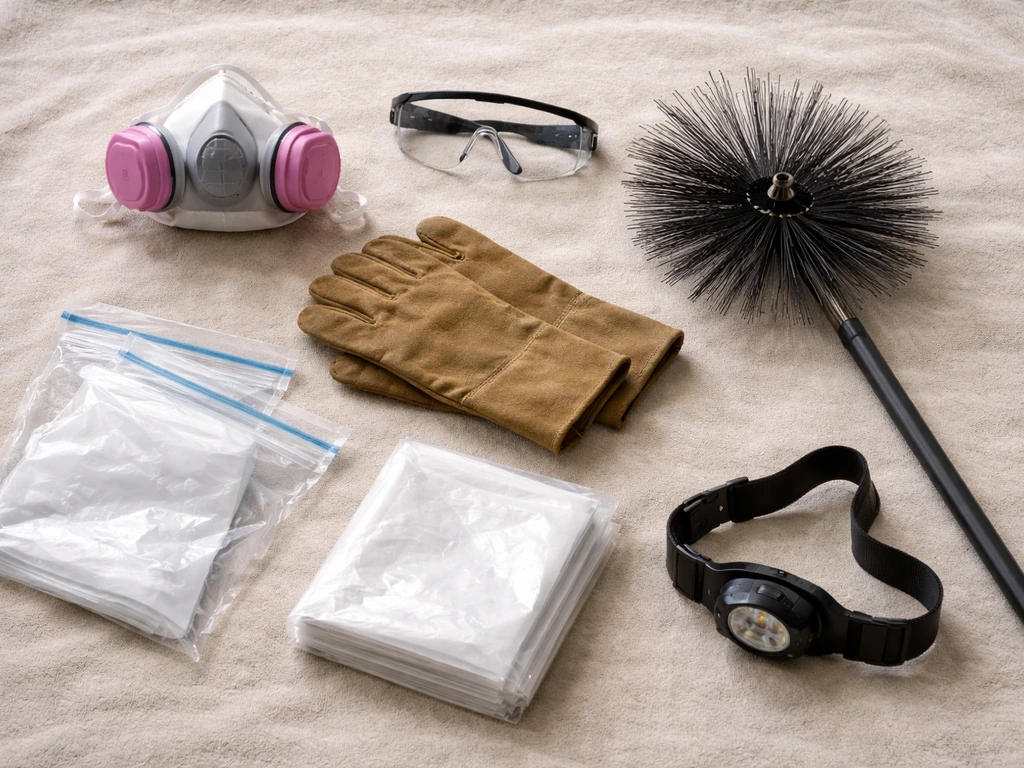
Personal protective equipment
- N95 respirator at minimum; a P100 half-face respirator provides better protection and is worth the cost for this job
- Safety glasses or goggles (not just reading glasses)
- Non-latex rubber or nitrile gloves
- Disposable coveralls, or old long-sleeved clothing that you can bag and wash immediately afterward
- Shoe covers or washable boots you can clean on-site
- Waterproof apron if using wet-cleaning methods
Tools and supplies

- Bright flashlight or headlamp for visual inspection
- Heavy-duty plastic bags (contractor-grade, at least 3 mil thickness) for bagging debris
- Long-handled chimney brush appropriate to your flue size (measure the flue liner before buying)
- Shop vacuum with a HEPA filter (standard shop vac without HEPA is not appropriate for this work)
- Spray bottle filled with water or a diluted disinfectant solution
- Drop cloth or plastic sheeting to cover the fireplace opening and hearth
- Duct tape to seal the fireplace opening
- Enzymatic odor-neutralizing spray for post-cleanup treatment
- A second person if possible, especially for roof access
Before starting, open a window in the room for ventilation, seal the fireplace opening completely with plastic sheeting and duct tape (you will work from above at the chimney top, not from inside the room), and lay your drop cloth on the hearth to catch any debris that falls through. If access to the chimney top requires ladder or roof work, set up your ladder on stable ground and have another person present for safety.
Step-by-step: removing the nest without harming birds or the chimney
These steps assume you have confirmed the nest is fully abandoned and all birds have left. Do not proceed if there is any sign of active occupancy.
- Put on all your PPE before you go anywhere near the chimney opening. Respirator, gloves, eye protection, and coveralls go on first.
- Take a photo of the nest before removing it. This is useful for identifying the species (which matters for any future prevention decisions), and it takes five seconds.
- From the chimney top, use your flashlight to visually confirm the nest is empty. Look carefully for eggs, chicks, or adult birds before touching anything.
- Lightly mist the nest material with water from your spray bottle. This is a critical step: wetting the material reduces airborne dust and lowers the risk of inhaling pathogen-laden particles. Do not soak it, just dampen it enough to reduce dustiness.
- Using gloved hands or long-handled tongs, carefully lift the nest out of the flue. Chimney swift nests are glued to the wall and may require gentle scraping to detach. Work slowly to keep the material intact rather than crumbling it.
- Place the nest directly into a heavy-duty plastic bag without shaking or compressing it. Seal the bag immediately.
- Mist any remaining debris or droppings visible in the flue before disturbing them. Use a long-handled chimney brush to dislodge loose material, working from the top downward so debris falls to the smoke shelf.
- Debris that falls to the smoke shelf can be scooped out through the firebox (with the plastic sheeting temporarily opened just enough to work). Bag all material immediately.
- Do a second flashlight inspection to confirm the flue is clear.
- Bag your gloves and disposable coveralls before coming off the roof. Wash hands thoroughly with soap and water as soon as you are done, even though you were wearing gloves.
A note on when to stop and call a professional: if the nest is large (more than a handful of material), if there is significant accumulation of droppings on the smoke shelf or damper, or if you have any doubts about safe roof or ladder access, consider hiring a certified chimney sweep who has experience with wildlife debris removal. Extensive droppings accumulation is a case where professional hazardous-waste handling is genuinely the safer option, not just a precaution.
Cleaning up: sweeping, vacuuming, disposal, and odor control
Removing the nest is only half the job. Leftover debris, droppings on the smoke shelf, and residual organic material in the flue are combustion hazards and ongoing pathogen sources. Here is how to handle the cleanup properly.
The most important rule: do not dry-sweep or use a standard vacuum
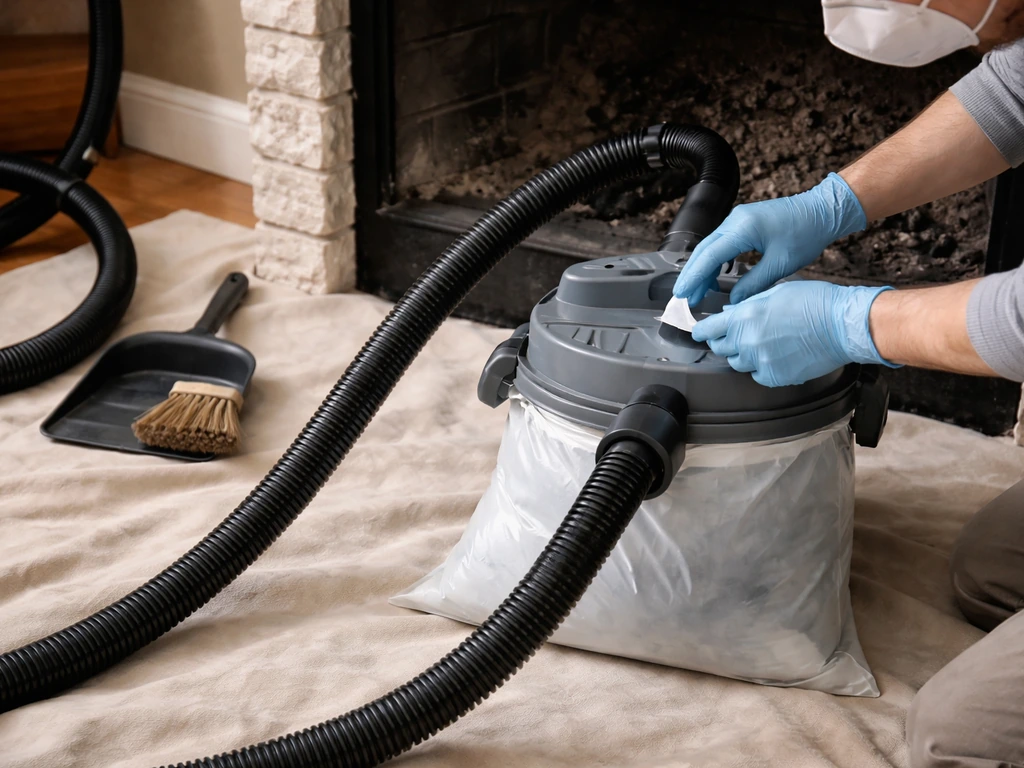
Dry sweeping and standard vacuuming are the two most common mistakes people make during this kind of cleanup. Both aerosolize pathogen-laden particles directly into your breathing zone. The CDC and OSHA guidance on bird and bat waste is consistent: never sweep or vacuum droppings dry. Instead, wet the surface first with water or a disinfectant solution, then clean with a damp method. If you are using a vacuum at all, it must have a true HEPA filter, not just a standard filter.
Cleaning the smoke shelf and firebox
- Keep your full PPE on for all cleaning steps.
- Mist the smoke shelf, damper, and any surfaces with visible droppings or debris using your spray bottle. Allow the moisture to sit for a minute before disturbing anything.
- Use a damp cloth or damp brush (not a dry brush) to collect debris from the smoke shelf. Place it directly into a sealed bag.
- For any droppings adhered to metal or masonry surfaces, apply disinfectant solution, allow it to dwell for several minutes, then wipe with a damp cloth.
- Vacuum loose dust or debris only with a HEPA-filter shop vac held close to the surface. Do not wave the nozzle around; keep it pressed against the surface to avoid sending particles airborne.
- Wipe down the firebox interior with a damp cloth as a final pass.
Disposal
Double-bag all nest material, droppings, and contaminated cleaning cloths or gloves. Seal each bag with tape, not just a tie. In most municipalities, double-bagged nest material from a single residential chimney can go in your regular trash. If there was an unusually large accumulation of droppings (more than a few cups of material), check with your local waste facility about whether it qualifies as biohazardous waste requiring special handling.
Odor control
After cleaning, any persistent organic smell in the flue or firebox is coming from residual material absorbed into masonry or from the smoke shelf. Spray an enzymatic odor neutralizer (not a masking fragrance) onto the smoke shelf and firebox interior and allow it to air dry with the damper open. Running the fireplace for a short burn on a non-windy day after full cleanup is also an effective way to bake out lingering odors, but only do this after you have confirmed the flue is completely clear of debris and blockages.
After the cleanup: inspecting the chimney and preventing future nesting
Once the nest is out and the cleaning is done, take twenty minutes to do a proper post-removal inspection before you call it finished. This step catches problems that could turn into fire hazards or structural damage.
Chimney function inspection checklist
- Check the damper: open and close it fully to confirm it moves freely and seals completely. Nesting material and droppings frequently jam damper plates or corrode hinges.
- Inspect the flue liner with a flashlight from below: look for cracks, spalled mortar, or sections where nesting material may have been packed against the liner. Serious cracks need professional masonry repair before the fireplace is used.
- Check the smoke shelf for any remaining debris that could fall into the firebox during a fire.
- Confirm the chimney cap or crown (the masonry surface at the top) is intact. Cracks in the crown let in water and wildlife.
- Test draft: with the fireplace cleaned out, light a small piece of newspaper inside and watch that smoke draws up and out correctly. Poor draft after a cleaning sometimes means residual blockage or a damaged liner.
- If you have any doubt about structural integrity or draft performance, schedule a Level 1 chimney inspection with a certified chimney sweep before using the fireplace.
Preventing future nesting: what actually works
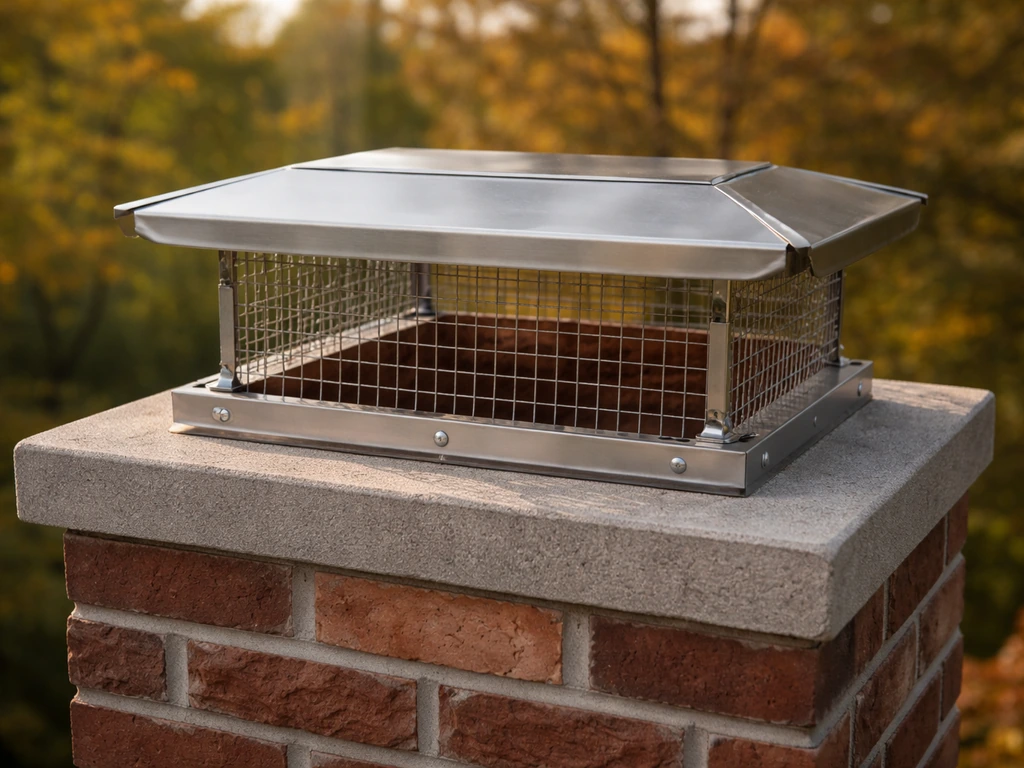
The most effective long-term solution is a properly fitted, ASTM-rated chimney cap. A good cap covers the entire flue opening with a mesh screen that keeps birds out while still allowing adequate draft. This is the single most cost-effective prevention investment you can make. Have it installed by a chimney sweep who can confirm it fits your specific flue dimensions, because a poorly fitted cap is nearly as bad as no cap at all.
Timing matters here, especially with chimney swifts. Audubon North Carolina recommends having a sweep install the cap in November, after swifts have left for the season, and if you ever want to give swifts access in future years, removing the cap in mid-March before they return in spring. The USFWS also advises that any construction or chimney modification should be completed after swifts have left in late summer or fall and finished before they return the following spring.
If you are conservation-minded and would like to support chimney swift populations (which are declining across North America), you can install a purpose-built chimney swift tower in your yard as an alternative nesting site. This gives the birds a home without putting nesting material in your working fireplace chimney.
Seasonal troubleshooting: quick-reference guide
| Time of Year | What You Likely Have | What You Can Do |
|---|---|---|
| Spring (March to May) | Nest being built or eggs just laid; high activity | Do not remove. Confirm active status and wait. Do not use fireplace. |
| Late spring to midsummer (May to July) | Active nest with eggs or chicks; adults entering/exiting daily | Do not remove. Wait for fledging. Contact wildlife rehabilitator if birds appear injured or trapped. |
| Late summer (August to September) | Young fledging and departing; activity winding down | Monitor for cessation of all activity. Begin preparing for removal once fully vacated. |
| Fall (October to November) | Nest fully abandoned; no bird activity | Safe and legal to remove. Ideal time to install chimney cap. |
| Winter (December to February) | Old nest material from prior season; no birds present | Safe to remove. Good time for full chimney inspection and cap installation before spring. |
When to call a professional
Call a certified chimney sweep if: the nest is large or deeply lodged in the flue, the damper or liner shows visible damage, draft is poor after your cleanup, or you are not confident about safe roof access. Call a licensed wildlife rehabilitator or your state wildlife agency if: you find injured or orphaned birds, you are unsure whether the nest is active, or you suspect the species may require special handling (raptors, protected cavity-nesting species, or anything unusual). For significant droppings accumulations, the CDC recommends professional hazardous-waste handling over DIY cleanup, so do not hesitate to make that call if the scale of contamination is beyond a small nest's worth of debris.
<a data-article-id="5730F7A5-BD3E-49D0-A553-DA663F3F41FD">Removing a bird nest from a chimney</a> is genuinely manageable as a DIY project when the timing is right, the nest is abandoned, and you have the right gear. If a bird nest falls out of a tree, the safest approach is to assess whether the birds are still present and then follow the same “active vs. abandoned” steps before moving anything what to do if bird nest fell out of tree. The steps that trip people up are almost always the same: moving too fast without confirming the nest is empty, skipping the respirator, or dry-sweeping debris that should be wetted first. If you are wondering what happens if you knock down a bird nest, keep in mind the big risk is likely disturbing an active nest and triggering both legal and health hazards, so use the same active versus abandoned checks first. Get those three things right, and the rest of the job is straightforward. If you are still trying to figure out how to get a bird nest down, focus on confirming the nest is abandoned and then follow the removal and cleanup steps in this guide. If you are still trying to figure out how to get rid of bird nest in tree, focus on confirming the nest is abandoned and then follow the removal and cleanup steps in this guide. If you need help with the legal and safety steps for removing a bird nest, follow the same guidance for <a data-article-id="6D8005C2-D7F6-4437-A083-5A0182A32E86">how to destroy bird nest</a> from an active chimney. If you are dealing with an active nest, follow the right legal process and safety steps for what destroys bird nests before doing anything how to destroy bird nest. If you are dealing with an active nest, follow the right legal process and safety steps for what destroys bird nests before doing anything <a data-article-id="6D8005C2-D7F6-4437-A083-5A0182A32E86">how to destroy bird nest</a>.
FAQ
What should I do if I discover the nest was still active after I started removing it?
If you remove the nest and later realize birds were still using it, stop further work immediately. Don a respirator and avoid disturbing any remaining debris, then contact your state wildlife agency or a wildlife rehabilitator for species-specific guidance. You may still need a professional chimney sweep to assess whether anything was left behind in the flue that could keep attracting birds or create ongoing contamination.
Can I remove the nest the same day the birds seem to stop moving or calling?
Yes. If the birds left on their own, you can proceed once you are confident the nest is abandoned, but you should still wait for any return activity to stop before cleaning. If you cannot confirm departure with reasonable certainty (ongoing sounds, fresh droppings, or new material), treat it as active and postpone removal until the birds are clearly gone.
How can I tell the difference between an empty-looking nest and an abandoned nest?
Don’t rely on appearance alone. A nest can look empty but still be active if eggs hatch late or a brooding adult remains hidden. Your best indicators are clear signs that young have fledged and no birds are coming back, over a meaningful window, and no fresh activity after reasonable observation.
Does the timing restriction also apply if I want to install or repair a chimney cap?
If you have to open or modify any part of the chimney structure (new cap installation, liner work, masonry repair), plan it around the nesting season. In many regions, the safest approach is to complete chimney modifications after swifts and other chimney nesters have left, and finish before they return, because doing work during occupancy can both harm birds and create legal risk.
What if I suspect the nest is from chimney swifts, but I’m not 100% sure?
Small, shallow nests made from twigs glued with saliva are a strong hint of chimney swifts, but you should confirm the species if you are unsure. If it is likely swifts, assume it is protected and wait until departure before doing any removal or chimney work. Trying to relocate the nest during nesting is not a safe or reliable workaround.
Is it ever worth hiring a pro even if it’s a small nest?
Soot and droppings cleanup should be treated like hazardous contamination. Wet-clean the area rather than dry-sweeping, and use a vacuum only if it has a true HEPA filter. If you see more than a light scatter of droppings, or the smoke shelf or damper area is heavily coated, professional handling is often the safest route because containment and disposal become more difficult at that scale.
What are the signs that the nest is too lodged or messy for DIY?
Some nests may be wedged behind the damper, on the liner, or deeper in the flue where removal could damage surfaces or create a larger dust plume. If the nest is larger than a handful, deeply lodged, or removal requires reaching beyond safe access, stop and use a certified chimney sweep familiar with wildlife debris rather than forcing it out.
Can I use the fireplace right after removing the nest to get rid of the smell?
Yes. After cleanup, keep the fireplace unused until the flue is fully clear and dry, and ensure the damper and smoke shelf are free of residual organic material. If you run a fire before verification, you risk igniting leftover debris or pushing remaining particles into the room. When odor persists, use an enzymatic odor neutralizer and air dry first, then consider a short test burn only after the flue is confirmed clear.
What if I find eggshells or a lot of decomposed material, not just a nest?
If the nest contains eggshells, significant material, or decomposed organic matter, it likely indicates more than a light, recent visit and may involve heavier contamination. In that case, prioritize thorough wet cleaning, double-bag disposal, and consider professional help if there is substantial droppings accumulation or strong lingering odor that suggests material absorbed into masonry.
If the nest debris is already on the hearth or floor, do I still follow the same wet-clean and bagging steps?
Use the same containment approach you would for active nesting debris. Avoid vacuuming or sweeping until the waste is wetted, wear respiratory protection, and double-bag everything. Also keep the area closed off from living spaces, because fine particles can migrate on HVAC systems or through foot traffic.
Where should I dispose of the double-bagged nest and droppings, and when does it become “special” waste?
For disposal, double-bagging with sealed tape is a practical standard approach for typical residential amounts. However, if droppings are heavy (for example, several cups or more) or if your local waste facility treats this as biohazard or special waste, you should follow their specific instructions to avoid illegal disposal and to reduce exposure during transport.
What should I do if my chimney still drafts poorly after the cleanup?
A persistent draft problem after cleanup usually points to an obstruction, damaged damper/liner, or leftover debris that blocked airflow. Don’t try to clear it by forcing tools through if you suspect liner damage or if debris remains, instead schedule a chimney sweep inspection to confirm the flue is intact and properly venting.
After removal, what should I inspect to prevent the same problem from coming back?
Before you do any further work, do a post-removal check for loose masonry, gaps, or a damaged liner, because wildlife activity often coincides with entry points. Then verify the chimney cap fit and that the mesh blocks access while still allowing normal draft, since a poorly fitted cap can let birds nest again and can trap debris that worsens odors.
Next Article
How to Remove a Bird Nest Safely and Legally
Step-by-step on removing an active bird nest legally and safely, excluding and deterring birds without harm.